Cisco Catalyst SD-WAN 20.15.1 | EVE-NG | VMware ESXi | Nexus | OpenSSL PKI
Introduction
I recently completed building a fully functional Cisco Catalyst SD-WAN lab using EVE-NG, hosted on my on-premises Cisco UCS infrastructure.
My objective wasn’t simply to deploy the controllers, get everything connected and consider the lab complete.
I wanted to understand the entire process, particularly how the SD-WAN control plane is established, how controllers authenticate one another, and how the underlying certificate infrastructure works.
I’ve worked extensively with traditional routing and switching technologies, including BGP, VRFs and Cisco Nexus environments. What interested me about SD-WAN was understanding how these familiar networking technologies integrate with a centrally managed, software-defined WAN architecture.
One area I particularly wanted to explore was the separation of the control plane from the data plane.
In a traditional network, routing decisions and packet forwarding are generally performed by the same router. Cisco SD-WAN introduces a different architecture, where routing information is centrally controlled through vSmart while WAN edges are responsible for forwarding traffic.
But before any of that can happen, the underlying infrastructure needs to be established and, most importantly, the different components must trust each other.
That trust is established using Public Key Infrastructure (PKI) and digital certificates.
This turned out to be one of the most interesting aspects of the entire deployment.
I also encountered several issues throughout the build, some of which were not immediately obvious. I’ll document those as well, including the steps that resolved them.
The intention is to provide a practical walkthrough that others can follow, rather than simply presenting a working configuration without explaining how we got there.
1. Lab infrastructure
I used my existing Cisco UCS C220 M4 server running VMware ESXi 7.0.
The server has approximately 192 GB of memory, with around 700 GB of storage allocated for my EVE-NG environment.
The SD-WAN controllers and supporting network devices were deployed within EVE-NG.
Software and components
Component
Software / Platform
Physical infrastructure
Cisco UCS C220 M4
Hypervisor
VMware ESXi 7.0
Network emulation
EVE-NG
SD-WAN Manager (vManage)
20.15.1
SD-WAN Controller (vSmart)
20.15.1
SD-WAN Validator (vBond)
20.15.1
WAN Edges (Part 2)
Catalyst 8000V 17.15.01a
WAN underlay
Cisco Nexus
Certificate Authority
OpenSSL on Linux
Management workstation
Ubuntu
An important consideration when deploying EVE-NG inside ESXi is nested virtualisation.
The virtual routers and controllers require access to hardware-assisted virtualisation. I enabled the relevant ESXi setting to expose hardware-assisted virtualisation to the EVE-NG virtual machine.
Without this, certain QEMU nodes were unable to start correctly.
This is worth checking before spending time troubleshooting the individual Cisco images.
2. Understanding the SD-WAN architecture
Before configuring anything, I wanted to understand exactly what each component was responsible for.
Cisco SD-WAN has three main control components:
vManage – Centralised management
vManage provides centralised management of the SD-WAN fabric.
It is responsible for tasks such as:
- Device onboarding and provisioning.
- Configuration templates.
- Centralised management and monitoring.
- Certificate management.
- Policy configuration and deployment.
One important distinction is that vManage is not responsible for directly forwarding enterprise user traffic.
vBond – Orchestration and authentication
vBond, now known as the SD-WAN Validator, assists with initial device discovery, authentication and orchestration.
It helps WAN edges discover the appropriate controllers and establish their initial trusted relationships.
It is not responsible for distributing enterprise routing information through OMP.
vSmart – The SD-WAN control plane
vSmart is responsible for the overlay routing control plane.
It establishes OMP relationships with WAN edges and distributes overlay routing information, including service routes and TLOC information, according to the policies applied to the fabric.
This is a fundamental difference from traditional WAN routing.
The WAN edges can continue using BGP or OSPF locally while vSmart distributes the relevant routing information between sites using OMP.
How the components interact
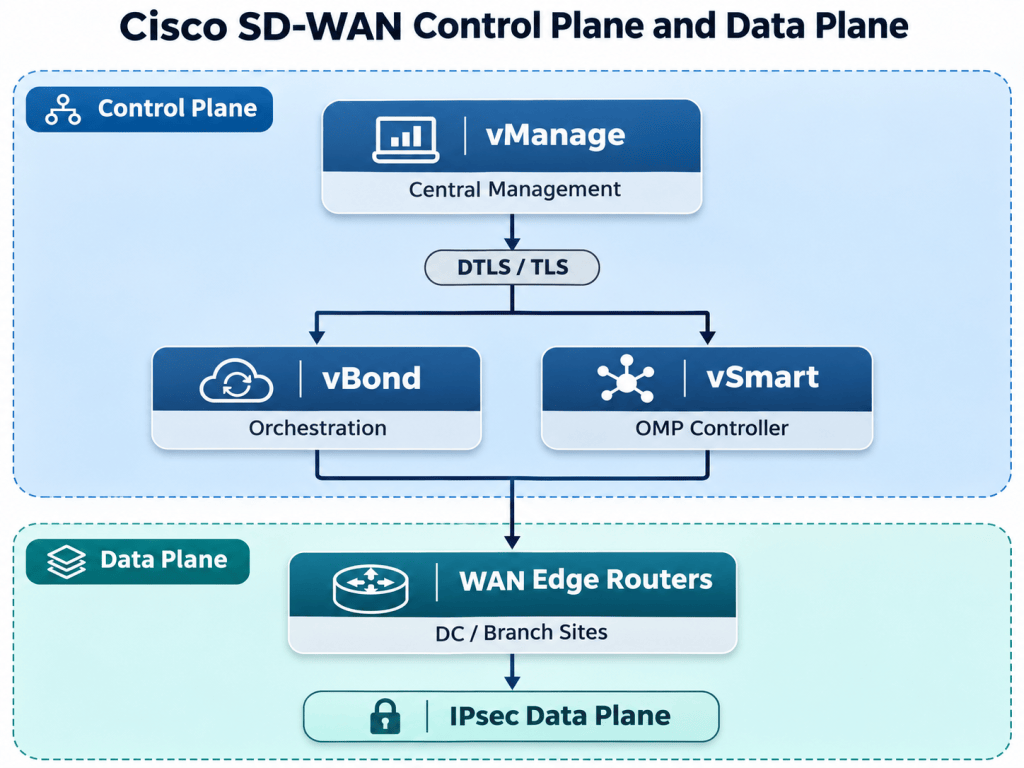
This is a simplified representation of the controller relationships, not a literal packet path.
The critical distinction is:
DTLS/TLS secures the SD-WAN control connections. OMP exchanges overlay routing information. IPsec protects the WAN edge-to-edge data plane.
I wanted to understand each of these independently before moving on to the enterprise routing configuration.
3. Building the WAN underlay with Cisco Nexus
I deliberately kept the initial WAN underlay simple.
I used a Cisco Nexus switch to provide Layer 3 connectivity between the SD-WAN controllers.
The transport network was:
172.16.100.0/24
Controller addressing
Component
VPN 0 address
System IP
Nexus WAN gateway
172.16.100.1
—
vManage
172.16.100.2
10.255.255.1
vSmart
172.16.100.3
10.255.255.2
vBond
172.16.100.4
10.255.255.3
All three controllers used the organisation name:
TAME-LAB
And controller Site ID:
100
The controller-facing Nexus ports were placed into the appropriate transport VLAN, with an SVI providing the common underlay gateway.
One thing worth understanding is the difference between the VPN 0 address and the System IP.
The VPN 0 address is associated with the actual transport interface used to establish IP connectivity.
The System IP is a unique logical identifier used by the SD-WAN fabric.
It doesn’t have to be the same address as the physical WAN interface.
Why did I place the controllers in the same network?
Initially, I wanted to eliminate unnecessary routing complexity.
By placing the controllers in the same Layer 3 subnet, I could verify basic IP reachability before investigating DTLS, certificates and controller authentication.
For example, from vManage I verified reachability to vSmart and vBond.
The important principle here is that underlay connectivity must exist before the secure SD-WAN control plane can be established.
A device might be reachable through ICMP, but that doesn’t necessarily mean it has established a trusted SD-WAN control connection.
That distinction becomes important later.
4. Configuring VPN 0 and VPN 512
Another fundamental aspect of the deployment was understanding the different VPNs used by Cisco SD-WAN.
VPN 0 — Transport
VPN 0 is the transport VPN.
It provides connectivity between SD-WAN devices across the underlying WAN networks.
For my lab, VPN 0 carried the connectivity required for establishing the controller relationships.
The vManage transport interface was connected to the Nexus underlay.
VPN 512 — Out-of-band management
VPN 512 is used for management.
In my environment, I needed to access the vManage GUI from my Ubuntu workstation.
I configured a separate management interface using my existing management network.
My final management addressing included:
Component
Management IP
EVE-NG
192.168.0.100
vManage
192.168.0.123
Ubuntu workstation
192.168.0.243
The vManage interface connected to the Nexus was used for VPN 0, while the other interface connected through EVE-NG Cloud0 for VPN 512 management access.
This separation allowed me to administer vManage without depending on the SD-WAN transport network.
First problem – vManage was unreachable
Despite configuring the IP addresses correctly, I couldn’t reach the vManage management interface from Ubuntu.
Initially, this appeared to be an IP configuration or routing issue.
However, the problem was actually in the underlying VMware ESXi networking.
EVE-NG was running as a virtual machine, and the controller traffic had to traverse the nested virtualisation environment.
After troubleshooting the relevant ESXi port group, I changed these settings:
ESXi security setting
Lab configuration
Promiscuous Mode
Accept
MAC Address Changes
Accept
Forged Transmits
Accept
After applying the changes to the correct lab port group, vManage became reachable.
I could successfully ping:192.168.0.123
And access the vManage management interface using HTTPS.
Lesson learned: When running EVE-NG inside ESXi, remember that the hypervisor is part of the network.
Even if the router or controller configuration is correct, the underlying virtual networking can still prevent communication.
These permissive security settings were used for my isolated nested lab and are not general production recommendations.
5. Initial controller configuration
Once vManage was accessible, I configured the basic SD-WAN system properties.
The three controllers needed consistent information, including:
- Organisation name.
- Site ID.
- Unique System IP.
- vBond address.
- Transport connectivity.
- Accurate system time.
For example, my vManage system configuration was based on:
config system host-name vManage system-ip 10.255.255.1 site-id 100 organization-name TAME-LAB vbond 172.16.100.4 commit
The exact CLI structure depends on the controller software and configuration context.
At this stage, the important thing was making sure the controllers agreed on the organisation name and knew the correct Validator address.
I then verified the local system properties and IP connectivity.
Useful diagnostic commands included:
show system status show interface show control local-properties show control connections
However, getting the IP connectivity working was only the first part.
The controllers still required valid identity certificates.
This is where I decided to build my own Certificate Authority.
6. Building my own Root Certificate Authority
I could have followed one of the Cisco-managed certificate authorisation processes.
Instead, I specifically wanted to understand the PKI process and establish my own trust infrastructure.
This allowed me to generate and sign the controller certificates using my own private Root CA.
The goal was straightforward:
Every controller would have its own identity certificate, but all three certificates would be signed by the same trusted Certificate Authority.
That would allow the controllers to validate one another during secure connection establishment.
Understanding the certificate process
The relationship looks like this:
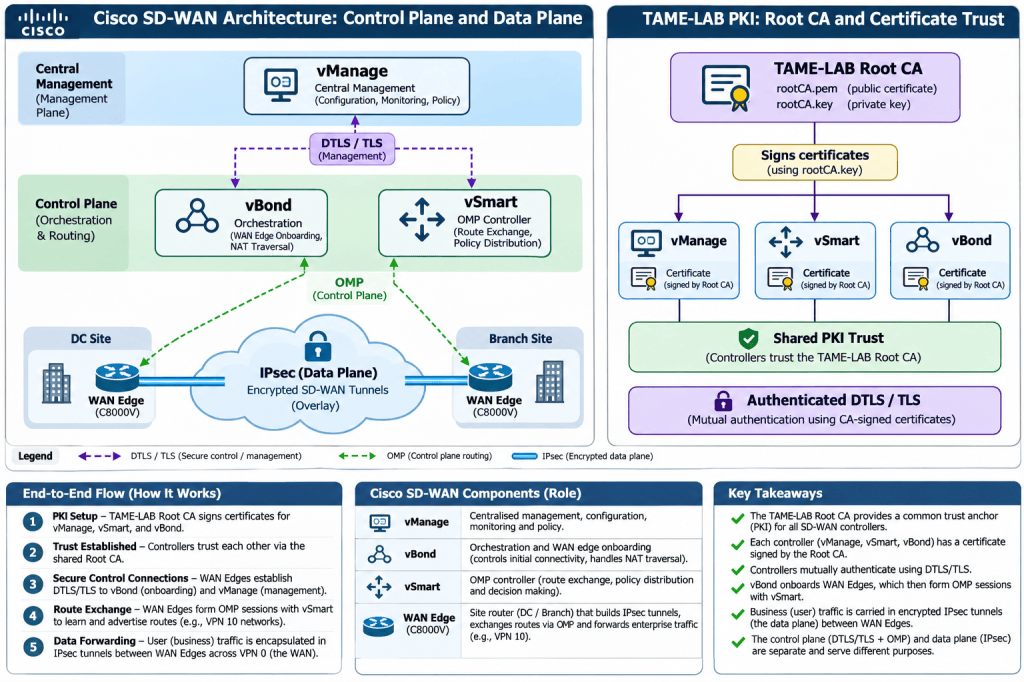
There are two files to understand:
The Root CA private key is used to sign certificates.
The Root CA public certificate is distributed to devices that need to trust those signatures.
The private key must remain secure. The public certificate is what we install into the trusted certificate store.
7. Creating the Root CA using OpenSSL
I used OpenSSL on Linux.
Step 1 — Generate the Root CA private key
openssl genrsa -aes256 -out rootCA.key 3072
This creates a 3072-bit RSA private key protected with AES-256 encryption and a passphrase.
The resulting file was:
rootCA.key
This is the most sensitive file in the entire certificate setup.
If someone obtains the private key and its passphrase, they could potentially sign certificates that appear to originate from our trusted CA.
Step 2 — Generate the Root CA certificate
Next, I created the Root CA certificate:
openssl req -x509 -new -sha256 \ -key rootCA.key \ -out rootCA.pem \ -days 3650 \ -subj "/C=GB/O=TAME-LAB/CN=TAME-LAB-Root-CA" \ -addext "basicConstraints=critical,CA:TRUE" \ -addext "keyUsage=critical,keyCertSign,cRLSign"
A few important parameters:
Parameter
Purpose
-x509
Generate an X.509 certificate
-sha256
Use SHA-256 for the signature
-days 3650
Set approximately 10 years’ validity
CA:TRUE
Identify the certificate as a CA
keyCertSign
Permit signing other certificates
cRLSign
Permit signing certificate revocation lists
The Common Name I used was:
TAME-LAB-Root-CA
We now had:rootCA.key rootCA.pem
The CA certificate was self-signed. That’s expected for a Root CA.
The trust doesn’t come from a higher authority in this particular lab — it comes from us explicitly installing and trusting our own Root CA.
8. Importing the Root CA into vManage
After generating the CA, I needed to configure vManage to trust it.
In vManage 20.15.1, I navigated to:
Administration → Settings → Controller Certificate Authorization
I selected:
Enterprise Root Certificate
Then imported rootCA.pem.
This is an important part of the process.
By importing our own Root CA, we were establishing the certificate trust anchor that the SD-WAN controllers would use.
However, importing the Root CA does not automatically mean that vManage, vBond or vSmart already have valid device certificates.
Each controller still needs a signed identity certificate.
This leads to the next stage: Certificate Signing Requests.
9. Generating the controller CSRs
A Certificate Signing Request, or CSR, is generated by the device requiring a certificate.
It contains identity information and the device’s public key.
The corresponding private key remains on the controller.
I generated the CSRs through:
Configuration → Certificates → Control Components
Starting with vManage, I selected:
Generate CSR → Download
The downloaded CSR originally had an automatically generated filename, which I renamed to make it easier to identify.
For example:
vmanage.csr
The same process was performed for vBond and vSmart.
I ended up with three separate CSRs:vmanage.csr vbond.csr vsmart.csr
Why three?
Because although the controllers share the same Root CA, they are different devices and must each possess their own cryptographic identity.
We should not reuse one controller’s private key or signed identity certificate across the other controllers.
10. Signing the vManage certificate
Now that I had the vManage CSR, I used the private CA we created earlier to sign it.
The OpenSSL command was:openssl x509 -req \ -in vmanage.csr \ -CA rootCA.pem \ -CAkey rootCA.key \ -CAcreateserial \ -out vmanage.crt \ -days 730 \ -sha256
This generated:
vmanage.crt
The important part is understanding what happened.
We took the public-key and identity information inside the vManage CSR and used our CA private key to sign a certificate for it.
The result was an identity certificate whose issuer was our TAME-LAB Root CA.
Verify the certificate
I then verified the result:openssl verify \ -CAfile rootCA.pem \ vmanage.crt
The output was:vmanage.crt: OK
This confirmed that OpenSSL could validate the signed certificate against our Root CA.
One point worth mentioning: certificate-chain verification alone does not confirm that every Cisco-required identity field is correct. Controller certificate properties still need to match the intended SD-WAN organisation and device identity.
11. First certificate failure — vManage clock was incorrect
This was one of the first significant issues I encountered.
I uploaded the signed vManage certificate through the certificate installation workflow, expecting it to install successfully.
Instead, the installation failed.
Initially, I suspected the certificate or the OpenSSL signing procedure.
However, after investigating the error, the problem turned out to be the system clock.
At the time, vManage was reporting a date around:
23 October 2026, 12:26 UTC
But the signed certificate had become valid on:
25 October 2026, 05:18 UTC
The installation error reported that the certificate’s validity start time was approximately 147,159 seconds ahead of the controller’s clock.
In other words, the controller was trying to validate a certificate that, according to its own clock, was not yet valid.
This is a fundamental part of X.509 certificate validation.
Certificates have validity periods, and the system performing the validation must have a sufficiently accurate clock.
The fix
I checked the current time:show clock
Then corrected it using the Viptela controller CLI syntax:clock set date 2026-10-25 time 05:25:00
The time shown is an example from the original troubleshooting session. For a new deployment, it must be replaced with the actual current UTC time.
After correcting the clock, I retried the certificate installation.
This time it succeeded.
The certificate status showed that the Root CA was installed and the controller certificate was valid.
Lesson learned: Before generating or installing controller certificates, verify the clock on every controller.
A clock issue can look like a certificate-signing problem even when the certificate is otherwise correct.
12. Signing and onboarding vBond
With vManage working, I moved on to vBond.
In vManage 20.15.1, I navigated to:
Configuration → Devices → Control Components
I added the Validator using its VPN 0 address:
172.16.100.4
The relevant settings included:
Parameter
Value
Controller type
Validator / vBond
VPN 0 IP
172.16.100.4
System IP
10.255.255.3
Site ID
100
Organisation
TAME-LAB
I used the controller’s administrative credentials and generated its CSR.
The CSR was downloaded and signed using our existing CA.openssl x509 -req \ -in vbond.csr \ -CA rootCA.pem \ -CAkey rootCA.key \ -CAcreateserial \ -out vbond.crt \ -days 730 \ -sha256
Again, the intention was to have a separate signed certificate for vBond, issued by the same Root CA.
Second certificate failure — Root CA chain validation
This was another interesting issue.
When attempting to install the vBond certificate, the process failed with an error indicating that the Root CA chain could not validate the certificate.
The error included:root-ca-chain unable to validate the certificate Aborting!
At this point, I had a signed certificate, but vBond did not have the necessary local trust chain installed correctly.
This highlighted the difference between a signed identity certificate and the Root CA required to validate it.
The fix
I transferred our public Root CA certificate onto vBond.
The certificate was placed at:/home/admin/rootCA.pem
Then I executed:request root-cert-chain install /home/admin/rootCA.pem
The command returned:Successfully installed the root certificate chain
After this, I retried the signed vBond certificate installation.
This time it succeeded.
I verified the installed certificate and control-plane connectivity.
The vBond DTLS connection came up.
Lesson learned: All relevant SD-WAN control components need the correct trust chain. Signing a certificate does not automatically guarantee that the receiving component trusts its issuer.
13. Signing and onboarding vSmart
The next stage was vSmart, the controller responsible for OMP.
Its VPN 0 address was:
172.16.100.3
And System IP:
10.255.255.2
I followed the same certificate process:
- Add vSmart under Control Components.
- Generate its CSR.
- Download the CSR.
- Sign the CSR using TAME-LAB Root CA.
- Install the Root CA chain where required.
- Install the signed identity certificate.
- Verify the controller connections.
The OpenSSL signing command followed the same approach:openssl x509 -req \ -in vsmart.csr \ -CA rootCA.pem \ -CAkey rootCA.key \ -CAcreateserial \ -out vsmart.crt \ -days 730 \ -sha256
However, I encountered another issue during vSmart onboarding.
Third issue — NETCONF connectivity failed
Although vSmart was reachable at the IP layer, vManage was unable to complete the required management connection.
The error involved NETCONF connectivity over TCP port 830.
This was an important reminder that successful ICMP reachability doesn’t mean all the necessary management-plane services are enabled.
The relevant services needed to be permitted on the vSmart VPN 0 tunnel interface.
The fix
On vSmart, I entered the configuration mode and enabled NETCONF and SSH access.config vpn 0 interface eth0 tunnel-interface allow-service netconf allow-service sshd commit and-quit
After applying the change, I retried the vSmart onboarding operation in vManage.
The management connection was successful, allowing the remaining certificate and controller configuration steps to complete.
At this point, vSmart had its own identity certificate signed by TAME-LAB Root CA.
Lesson learned: Troubleshoot controller onboarding in stages.
First verify Layer 3 reachability, then the required TCP services, followed by certificate trust and DTLS/TLS control connections.
These are separate dependencies.
14. Verifying the SD-WAN control plane
With the Root CA installed and all three controller certificates signed and installed, I moved on to verifying the actual control connections.
This is the point where I wanted to confirm that the deployment was genuinely operational rather than simply showing three controllers as powered on.
Useful verification commands on the Viptela controllers included:show control connections show control local-properties show certificate installed show certificate root-ca-cert show clock
The specific commands available can differ depending on whether the device is a Viptela controller or an IOS XE WAN edge.
I was checking:
- Whether the controllers had valid installed certificates.
- Whether the Root CA trust chain was present.
- Whether the organisation name matched across all controllers.
- Whether the controller System IPs were unique.
- Whether secure control connections were established.
What we achieved
The three controllers were successfully brought online:
Controller
VPN 0 IP
System IP
Result
vManage
172.16.100.2
10.255.255.1
Operational
vSmart
172.16.100.3
10.255.255.2
Operational
vBond
172.16.100.4
10.255.255.3
Operational
The controllers had valid certificates and successfully established their required control-plane relationships.
Our custom TAME-LAB CA was now the common trust authority for the controller identities.
This was the first major milestone.
We had established the fundamental SD-WAN controller infrastructure without yet onboarding a single enterprise WAN edge.
15. Understanding what we actually built
Looking back, there were several technologies involved, and I think it’s useful to separate them.
The Nexus underlay provided reachability
The Nexus transport network allowed the controllers to communicate through IP.
Without underlay connectivity, the controllers could not reach one another.
PKI provided identity and trust
Our custom Root CA signed the controller certificates.
The certificates allowed each controller to prove its identity and validate the identity of its peers.
DTLS/TLS secured the control connections
Once the identity and trust checks succeeded, the controllers could establish authenticated and encrypted control communication.
vSmart provided the routing control function
With the controller infrastructure established, vSmart was ready to accept OMP connections from WAN edge devices.
OMP would later be responsible for distributing service VPN routes, TLOC information and relevant routing attributes across the fabric.
The data plane would be established later
At this point, we had not yet completed edge-to-edge IPsec forwarding or enterprise BGP route integration.
That was the next stage of the project.
This separation is what helped me understand SD-WAN properly.
Underlay connectivity, controller authentication, control-plane routing and data-plane forwarding are related, but they are not the same thing.
16. The issues I’d avoid if I were rebuilding the lab
If I were starting the deployment again, I would approach it in this order.
Stage
What I would verify
1. Virtualisation
Nested virtualisation, EVE-NG node resources and ESXi networking
2. Management
vManage VPN 512 connectivity and GUI access
3. Underlay
Nexus connectivity between all VPN 0 addresses
4. System configuration
Organisation, Site ID, System IP and Validator
5. Time
Accurate clock on every controller
6. Root CA
CA private key and self-signed public certificate
7. vManage certificate
CSR, CA signing, installation and validation
8. vBond certificate
Root CA chain, CSR, signed certificate and DTLS
9. vSmart certificate
NETCONF/SSH reachability, CA chain and signed certificate
10. Final verification
All controllers authenticated and operational
The main lesson for me was to avoid jumping ahead.
For example, if a controller cannot establish DTLS, there’s little value in troubleshooting OMP first.
Similarly, if the signed certificate isn’t being accepted, verify the trust chain and system time before regenerating certificates unnecessarily.
Understanding the dependency between each component makes troubleshooting considerably more systematic.
Conclusion
The first phase of this project involved much more than simply installing vManage, vBond and vSmart.
I built the controller infrastructure on EVE-NG, configured the Nexus transport network, separated management and transport connectivity, generated my own Root CA, signed each controller certificate and resolved the authentication issues preventing the controllers from establishing secure communications.
What I found particularly interesting was how much the certificate infrastructure contributes to the overall SD-WAN architecture.
The Root CA establishes trust, the certificates establish device identity, and DTLS/TLS uses those authenticated identities to secure the control-plane communications.
Only once that foundation is in place can we begin onboarding WAN edges and distributing routes using OMP.
By the end of Part 1, all three SD-WAN controllers were operational, authenticated and communicating securely using certificates signed by our own Enterprise Root CA.
In Part 2, I’ll cover how I onboarded two Catalyst 8000V routers into the SD-WAN fabric, including the issues I encountered with Cloud-Init bootstrapping, certificate installation and Controller-Managed mode.
I’ll also cover the integration between BGP and OMP, where I used Cisco Nexus routers to advertise separate DC and Branch networks across the SD-WAN overlay.
That was the stage where the entire architecture came together.
Cisco technical references
- Cisco Catalyst SD-WAN — Certificate Management
- Cisco — Control Components Certificate Deployment Guide
- Cisco — Rebuild Your Catalyst SD-WAN Fabric
- Cisco — Controller Certificate Renewal and Troubleshooting
All configurations were performed in an isolated EVE-NG lab using Cisco SD-WAN 20.15.1. CLI syntax, GUI navigation and certificate procedures may differ across software versions.


Leave a Reply