
I manage and look after the entire infrastructure at a small higher education campus all by my self. This includes the network Infrastructure, server admin and end-point support. Our network devices are diverse and it’s a complete multivendor environment.
It’s really important for me to automate tasks to save on crucial time.
Nearly all our access switches are L2+ Netgear smart switches.
Although Netgear Prosafe switches are packed with L2+L3 features(LACP, L2-L3 ACLs, QoS etc) for budget price.
The issue with Netgear smart switches is they don’t support CLI access “officially”.
Only the M series Netgear Prosafe officially support CLI.
I desperately needed CLI access in order to run a LLDP automation script for inventory. The goal was to use my favourite python scrapper netmiko module to parse output into dictionary then eventually into a spreadsheet.
But without CLI on some of my access switches. I hit a road block!
After running nmaps on the Prosafe
Switches I realised port 23 was actually open.
The telnet server on the Netgear Prosafe switches is actually off by default.
Netgear clearly states that you can enable telnet “for diagnostic and development purposes.”
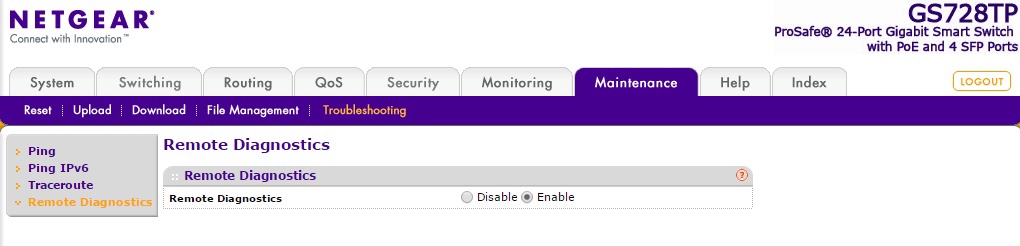
1 Enable Telnet
On the management portal go to Maintenance > Troubleshooting > Remote Diagnostics.

2. Login via terminal
Once you have telnet enabled, simply connect using any terminal client of your choice (putty etc) the user and password is same as GUI mgmt portal (my personal favourite SecureCRT)
3. Enter Configuration Mode
Once you are logged in, you will be at the CLI to enter privileged EXEC, simply type “Enable” then to enter global configuration mode
Type “Config Terminal” or “Conf T”
4. Enable SSH
Now we can proceed to enable SSH Type “ip ssh server” to enable ssh access. When you press enter, it will save the configuration immediately, and you will see something similar to this:
27-Jun-2022 16:16:41 %COPY-N-LOGGINGFILECOPYSTOP: stop log messages related to file copy operations
27-Jun-2022 16:16:43 %COPY-N-LOGGINGFILECOPY: start log messages related to file copy operations
Wait for this to finish before issuing another command.
5. Enable Password Auth
Next, enable password authentication by typing “ip ssh password-auth”. Again, you will see messages while it saves the configuration.
6. Change SSH Timeout
You can view and change the SSH timeout (as well as other options) from the command line. Enter config mode and then type line ssh. The prompt will now show (config-line)#. Type do show line ssh to view the current configuration, and you’ll see that by default the SSH timeout is 10 minutes. You can increase it to 60 minutes with exec-timeout 60.
8. Save Running Config
Type “copy running-config startup-config”
NOTE: on some Netgear smart switches the Telnet server is actually running on port 60000. You can easily modify Telnet/ssh port via cli after the initial access. So if port 23 isn’t responding try 60000
The great thing about Prosafe switches is if you are familiar with CISCO IOS/IOSXE the CLI commands is almost identical.
Because CLI is almost identical, I was able to run my LLDP python script across multiple NetGear Prosafe access switches at the same time without much issues.


Leave a comment